Corporate Employees
Purpose
The main purpose of this module is to enable the administrator to view and manage the employees under the particular corporate company. The corporate employees added by the corporate admin from here will be able to login into the eShop Website/Mobile application and able to purchase the products that are allocated to the particular corporate employees.
Navigation Path
Path: Corporate Mgmt. > Corporate Employees
Listing Screen
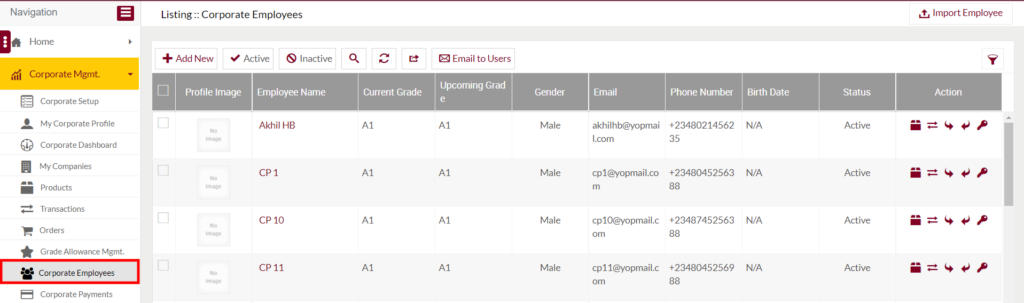
View the list of the corporate employees under the particular corporate company that is added by the corporate admin previously. Admin will be able to search the data using the filter option provided on the list.
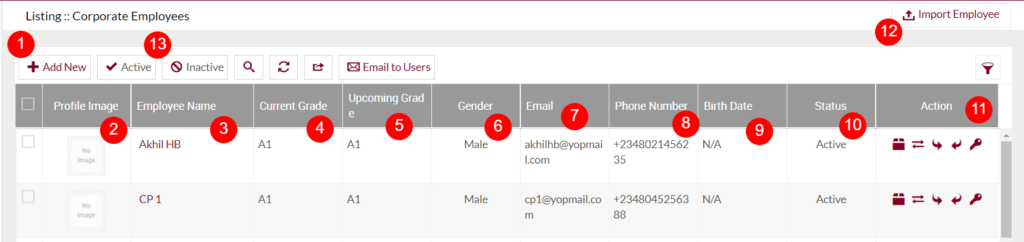
1. Add Corporate Employee: To add a new corporate employee under the particular corporate company, click on the below button

Add/Edit Corporate Employee
- Users will be able to Add/Update the corporate employee from this page
- The user needs to fill in the below information to add/edit the corporate employee.
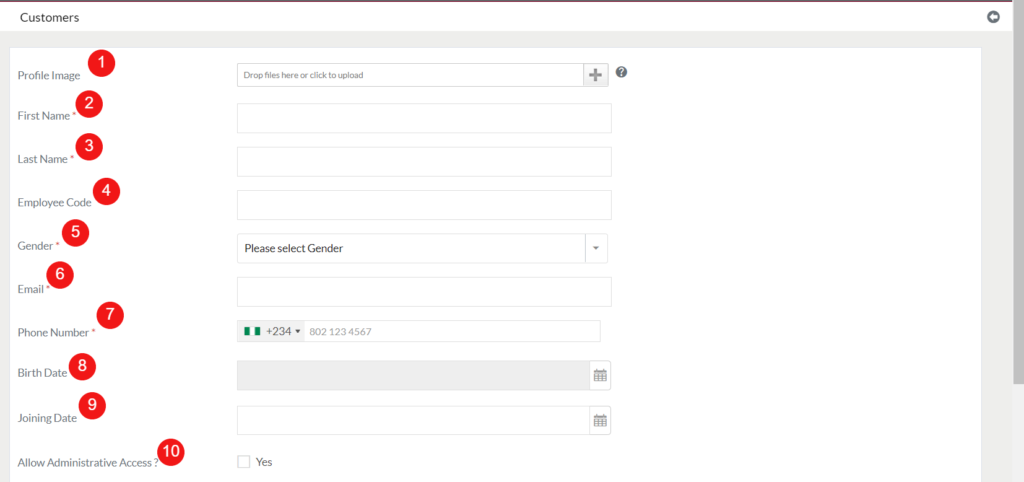
- Profile Image: Upload the profile image of the employee.
- First Name (Required): Specify the first name of the employee.
- Last Name (Required): Specify the last name of the employee.
- Employee Code: Specify the employee code.
- Gender (Required): Specify the gender of the employee.
- Email (Required): Specify the email address of the employee.
- Phone Number (Required): Specify the phone number of the employee.
- Birth Date: Specify the birth date of the employee.
- Joining Date: Specify the employee joining date.
- Allow Administrative Access?: Select yes if you want to provide administrative access to the employee. If Administratie access has been provided, then the employee will act as a corporate admin and will be allowed to perform all the actions of the corporate admin.
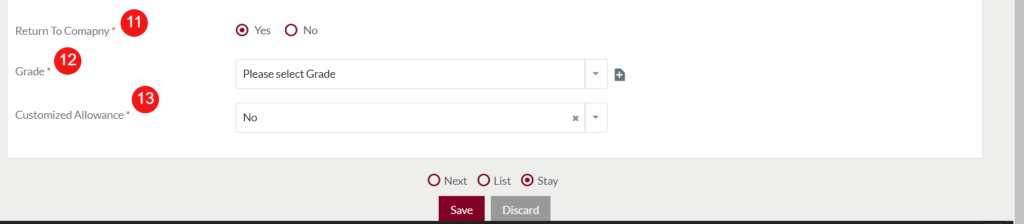
- Return To Company (Required): Select “Yes” if you want to return the allocated products from the corporate employee after completing the credit frequency period. Select “No”, if you don’t want to return the products from the employee.
- Grade (Required): Select the grade that you want to allocate the employee. Based on the selected grade the allocation will be allocated to the employees.
- Customized Allowance (Required): Select “Yes”, if you want to allocate the employee as per wish, instead of the selected grade. not based on the grade. Instead of allocated the allowance as per the selected grade, by selecting the option “Yes”, you can allocate the products or amount to the employees as per your wish. If selected “No”, then the allocation will be done as per the grade.
2. Profile Image: Specifies the profile image of the employee.
3. Employee Name: Specifies the name of the employee. On click, the user can view the summary of the particular employee. Summary: Under the summary, page user can view the following details
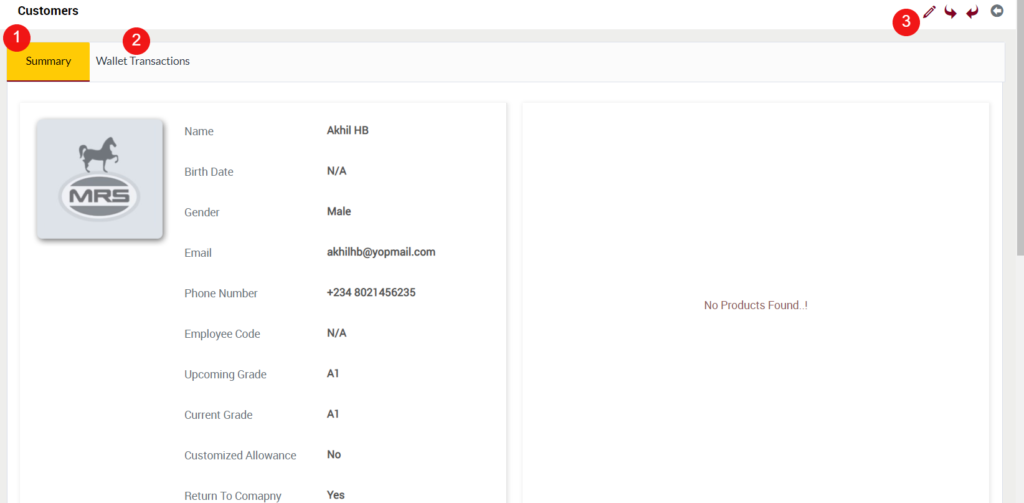
- Summary of the employee.
- Employee available Products stock.
- Employee allowance as per the upcoming grade.
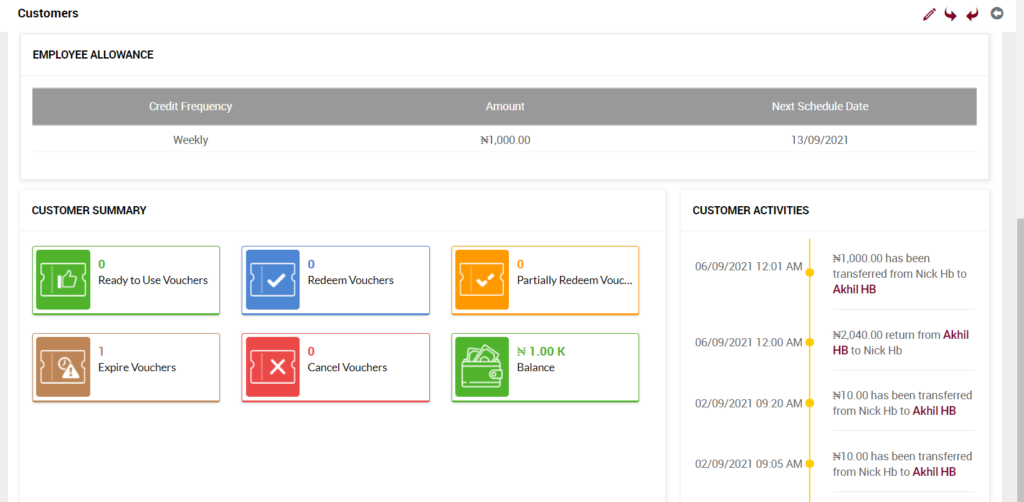
- Employee Summary: The user will be able to view the count of the particular employee’s vouchers as per the below status. On clicking the count, the user will be able to view the particular voucher details.
- Ready to Use Vouchers
- Redeem Vouchers
- Partially Redeem Vouchers
- Expire Vouchers
- Cancel Vouches
- Wallet Balance (Displayed only if the employee is under the grade type “Amount”.)
- Activities of the particular customers.
- Wallet Transactions: On clicking the “Wallet Transactions” tab, the user can view the details of the particular employee’s wallet transactions.
- Edit: On clicking the edit icon, under the summary page, the user can edit the particular employee details.
4. Current Grade: Specifies the current grade of the employee.
5. Upcoming Grade: Specifies the upcoming grade of the employee.
6. Gender: Specifies the gender of the employee.
7. Email: Specifies the email address of the employee.
8. Phone Number: Specifies the phone number of the employee.
9. Birth Date: Specifies the birthdate of the employee.
10. Status: Specifies the status of the employee.
11. Action: The user will be able to perform the following actions under the action field.
- Employee Prodcuts: Specifies the list of the products available in the employee’s account.
- Product Transactions: Specifies the list of the particular employee’s products transactions.
- Allocate Allowance/Allocate Amount: On click, the user can allocate prodcuts or amounts to the employee based on the employee’s grade.
- Return Allowance/Return Amount: On click, the user can return prodcuts or amounts from the employee based on the employee’s grade.
- Reset Password: On click, the user can reset the password for the employee’s account.
12. Import Employee: On click, the user can add multiple employees by importing a CSV file of that employee’s data.

13. Active/Inactive Corporate Employee: By selecting the required employee’s columns and by clicking on the active/inactive button user can activate or inactivate the particular employee.